Now that the Holiday season is fast approaching I have to admit I’ve gone a little Pinterest crazy. I’ve been pinning things left, right and centre for a couple of weeks now. One of the first winter / Holiday themed crafts I stumbled across was this Coffee Filter Wreath done by The Frugal Homemaker.
I absolutely fell in LOVE with it and thought – “Hey, that’s easy enough. I can definitely do that.” So I did! And it turned out so amazingly I’m going to do another one!
It really was easy and cost me a grand total of $3.59! 😀 Can’t very well beat that!
My first crafting project was a Fall Wreath. I’d never really done a craft before so I was completely green. I went to Michaels and purchased a wreath form ($10 – 40% off coupon). This How-To showed me a super cheap alternative! All you need is some inexpensive pipe insulation. This stuff comes in a different thicknesses and can be picked up at any home improvement store. I bought a 3/4″ thick section of tubing that was 6ft long at Canadian Tire for $1.18. The thinner (1/2″) tubing was a bit cheaper but I didn’t think it would have the same bushiness I was looking for. I just cut the tubing in half to make two 36″ forms at 59 cents each!
You will also need between 100-200 coffee filters depending on how closely you pack them on your form and how big your wreath is. I picked mine up at Dollarama 100 pack for $1. You will also need a glue gun, a few sticks of glue and some packing tape or Duck tape. The bow is optional but I picked mine up at Canadian Tire for $1.

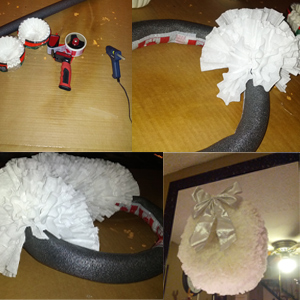
After cutting your tubing to the desired length, you will have to bend it together to make a circle and attached the ends with the tape. This is easier said then done. I tried everything to get as close to a circle as possible but it was pretty hard – the tubing just wanted to keep kinking up. I finally figured out that if I taped up the slice in the tubing (where it would wrap around a pipe) that it held it’s shape a little better. I later found this Pin for another tip on how to avoid kinking – I will be trying this with my next wreath.

Once your form is made, the rest is as easy as scrunch, glue, hold. Take a coffee filter and scrunch it up however you like. I basically just scrunched mine up into a cone shape and flattened the point out for better gluing.
Now there are a few things I learned quickly doing this. Hot glue is HOT and foam pipe insulation melts. It seems like common sense, I know but hey – I’m still learning here!
The first few I did, I put a drop of glue on the form, stuck on the filter and held for a few seconds. This resulted in the form melting and my fingers being burnt. To correct this, I instead put a dab of glue right on the flattened end of the filter, waited 5 seconds then stuck it on and held for another few seconds. Still wound up burning myself a few more times but it stopped the form melting problem.

Continue to cover the form until it is totally covered. You can pack the filters as close or spaced as suits you. I liked the look of them packed into together and used about 150 filters to do the whole thing (and now that its done there are still a few places I see that could use a few more).


You want to be sure to cover both the inner and outer circumferences to have a complete look. Once I had the form covered I actually debated for a few days what I was going to do with it. I realized after I was done, that I had no way of hanging this lovely thing. Hmmm. In the original Pin there wasn’t really any direction on how it was hung so this is what I did. I just took some fishing line and slipped it in between the filters all the way down to the form. I tied a knot and then made a loop. Then hooked the loop onto a suction cup hook on my mirror.

I loved the way it turned out but wanted to add a bow. I had some ribbon around and tried to make one myself but that was an epic fail. So the pre-made version worked just peachy! I just used the ties from the bow and fed them through the filters and tied it off in the back.
I am in love, love, love this project! In the Pin she said it took her about an hour, I found it took me closer to 2 hours to do the whole thing. Mind you I was watching TV and taking breaks throughout the whole process.

Have you done any crafts with coffee filters before? Please share in the comments below!
I plan on doing a lot more crafts this season and I will share them all with you! Stay tuned!